Fire Text Effect
Open fire has a hypnotic and relaxing effect, which is probably the reason why people love to gaze at it. In this tutorial, you will learn how to create text on fire for your various typography needs with the Art Text software.
This tutorial will cover the use of different spray fills and distortion effects and explain what each distortion is capable of. So, let’s move on to the five steps of creating a fire text effect.
Create a Background for the Fire Text
Fire typography usually looks good on a darker background. Start by adding a rectangle from Shapes > Smart Shapes, then fill it with an oval-type gradient.
On the gradient slider, add a third color dot so that there are three gradient color transitions. Set dot colors as follows.
Black dot HSB sliders:
- Hue – 7°
- Saturation – 69%
- Brightness – 0%
Dark red dot HSB sliders:
- Hue – 7°
- Saturation – 69%
- Brightness – 23%
Red dot HSB sliders:
- Hue – 15°
- Saturation – 90%
- Brightness – 51%
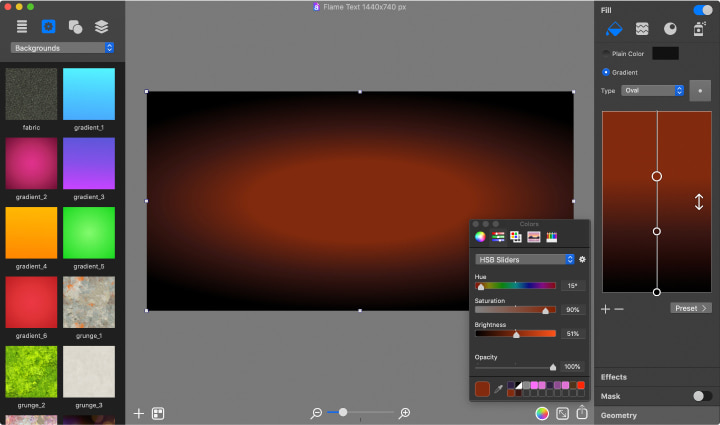
Then pull the dark red dot ⅓ away from the black one, and red dot ⅔ away from the black one (see picture above) to create a centered glow background for the fire text.
Art Text offers many background presets that you can use instead.
Add a Text Layer
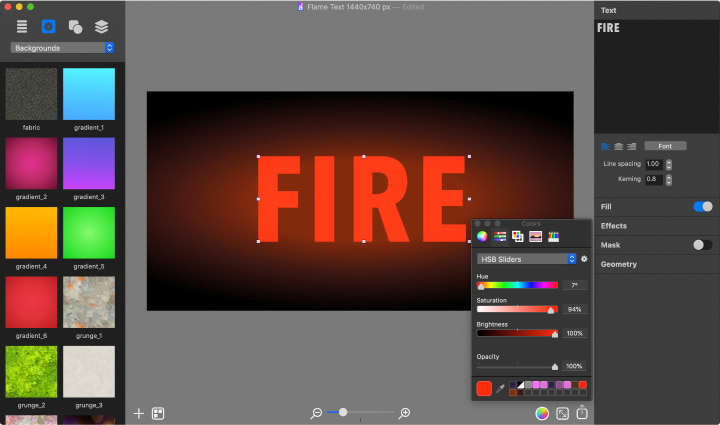
Now, let’s move on to adding text and working with it. To add a text layer, click the “+” button in the bottom ribbon and add 2D Text, or use the Layers menu > Add 2D Text.
Once a default text is added, you can change the wording to “FIRE” in the Text tab of the Inspector panel and change the text font via the Font button. You can use any typeface you have or one from Google Fonts, but, for this particular tutorial, let’s use Avenir Next Condensed–Bold. It is also recommended to increase the kerning a little to 0.8 to spread the letters slightly.
To change the text color, go to the Fill tab of the Inspector and click on the Plain Color box. For the purpose of this tutorial, set the color HSB sliders as follows:
- Hue – 7°
- Saturation – 94%
- Brightness – 100%
Apply Different Distortion Effects
Art Text has many different text effect tools, one of them being the Distortions tool, which applies to 2D text only, not 3D. The range of Distortion effects modifies the object’s contour before other effects are applied. These distortion effects alter the font shape beyond standard typeface options.
Distortion effects are available in the Effects tab of the Inspector. To add distortion, click on the “+” button, and select the necessary effect. To enter distortion parameters click on the gear wheel icon next to the distortion. Below is the order of Distortion effects and parameters you need to enter.
Roundness:
- Roundness – 20
- Offset – 0.2
- Sharpness – 1
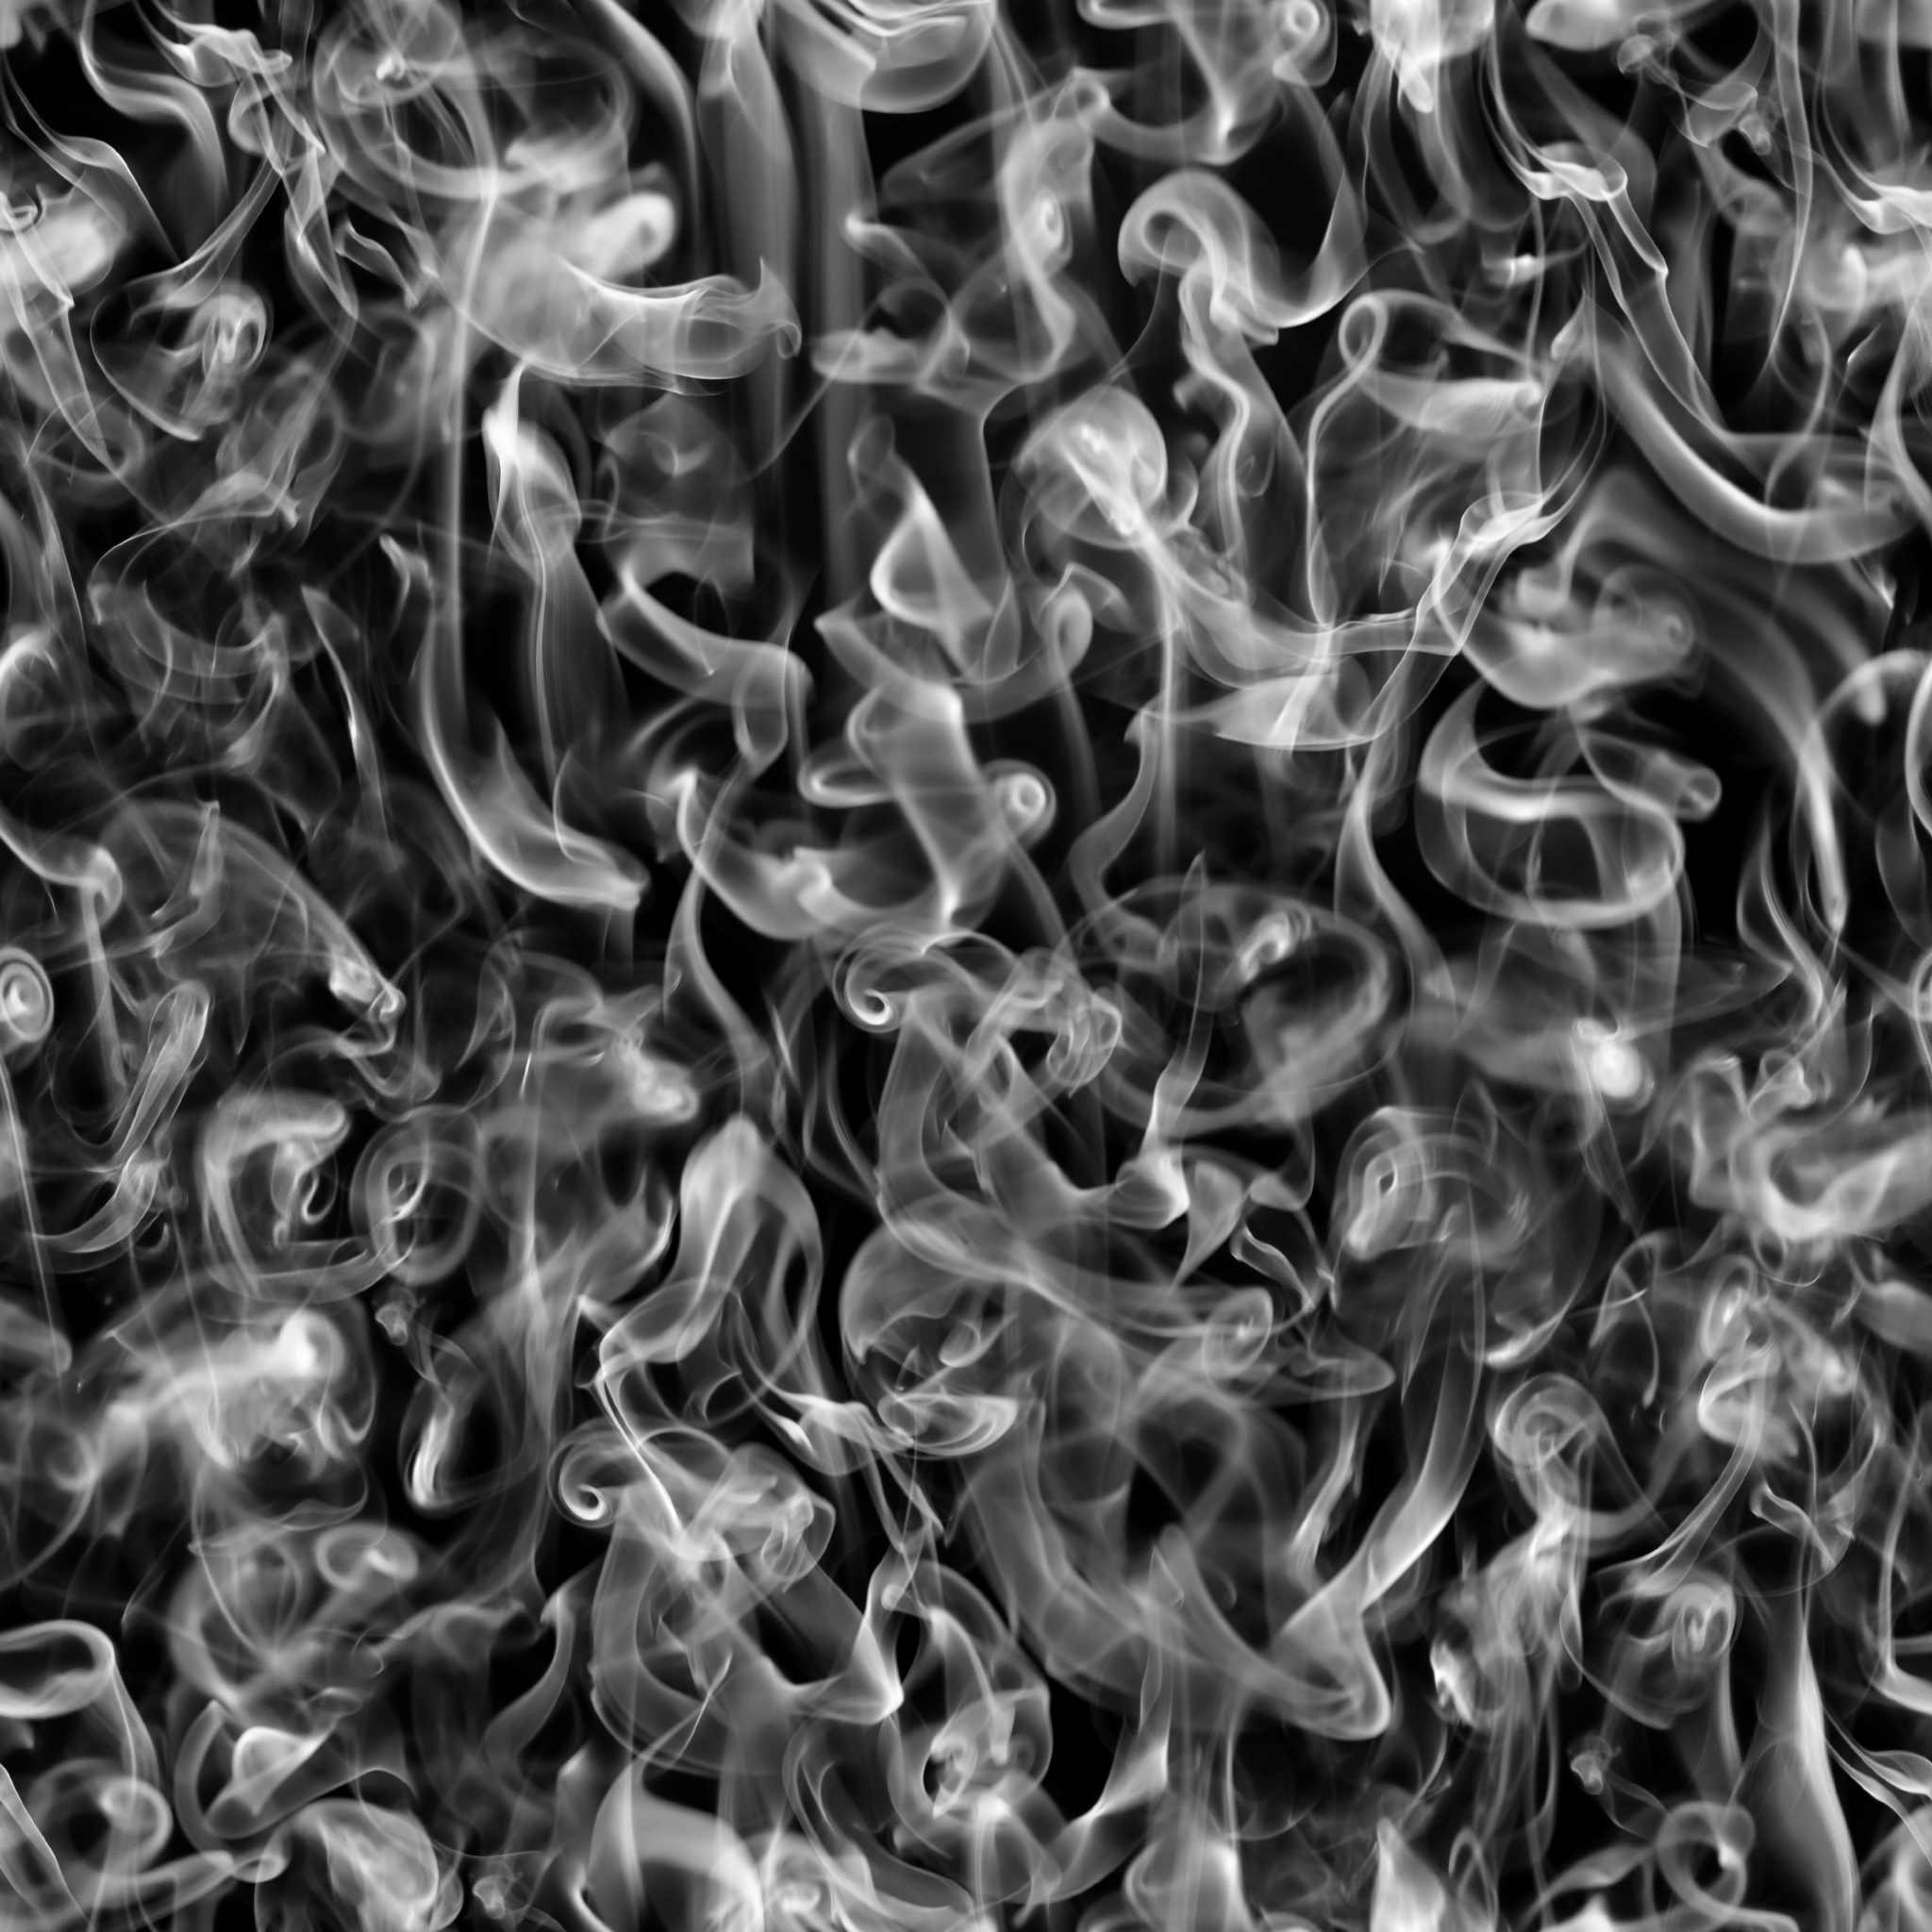
Texture—download smoke_tile.png to use as a custom texture. Then use Custom Folder to import it to textures. This texture will be used in every distortion where texture is required.
Displacement:
- Texture – smoke_tile
- Scale – 0.47
- Amount – 1.59
- Details – 44
Blur:
- Texture – smoke_tile
- Scale – 0.47
- Amount – 23
- Details – 50
Mask:
- Texture – smoke_tile
- Scale – 0.47
- Brightness – 0
- Contrast – 0
- Blur – 0
Outer Distress:
- Texture – smoke_tile
- Scale – 0.47
- Density – 0.72
- Radius – 44
- Spread – 64
- Details – 100
- Contrast – 0.5
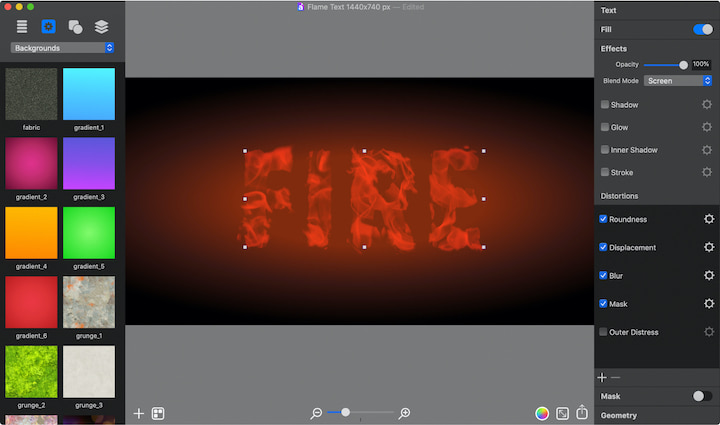
Note! The picture above shows how distortions change the text shape. Outer Distress was not applied to give you a better understanding, although you should apply it to create the first layer for the burning text effect.
Duplicate the Text Layer
To create a realistic text on fire effect, it is necessary to create three more text layers but with different Distortion effects and text colors. You can duplicate the previous text layer via Edit menu > Duplicate, or use Command+D shortcut, and then slightly adjust Distortion properties and add, delete or reposition Distortions in the list (you can pull the distortions up and down).
Alternatively, you can repeat steps 2 and 3 to add a text layer with necessary Distortions and fill color. Below you will find properties for three more text layers. When you create new text layers, don’t forget to change the default word to FIRE and position them one above another.
Fire Text Layer 2
Text Color HSB Sliders:
- Hue – 55°
- Saturation – 100%
- Brightness – 100%
Distortions:
- Roundness:
- Roundness – 20
- Offset – 0.2
- Sharpness – 1
- Erosion:
- Texture – smoke_tile
- Scale – 0.47
- Amount – 0
- Spread – 87
- Simplicity – 0
- Displacement:
- Texture – smoke_tile
- Scale – 0.47
- Amount – 1.31
- Details – 44
- Blur:
- Texture – smoke_tile
- Scale – 0.47
- Amount – 53
- Details – 50
- Outer Distress:
- Texture – smoke_tile
- Scale – 0.47
- Density – 0.53
- Radius – 40
- Spread – 64
- Details – 100
- Contrast – 0.5
- Mask:
- Texture – smoke_tile
- Scale – 0.47
- Brightness – 0
- Contrast – 0
- Blur – 0

Fire Text Layer 3
Text Color HSB Sliders:
- Hue – 55°
- Saturation – 30%
- Brightness – 100%
Distortions:
- Roundness:
- Roundness – 20
- Offset – 0.2
- Sharpness – 1
- Erosion:
- Texture – smoke_tile
- Scale – 0.47
- Amount – 0
- Spread – 87
- Simplicity – 0
- Displacement:
- Texture – smoke_tile
- Scale – 0.47
- Amount – 2.15
- Details – 41
- Blur:
- Texture – smoke_tile
- Scale – 0.47
- Amount – 53
- Details – 50
- Outer Distress:
- Texture – smoke_tile
- Scale – 0.47
- Density – 0.27
- Radius – 33
- Spread – 64
- Details – 100
- Contrast – 0.5
- Mask:
- Texture – smoke_tile
- Scale – 0.47
- Brightness – -0.57
- Contrast – 0
- Blur – 0

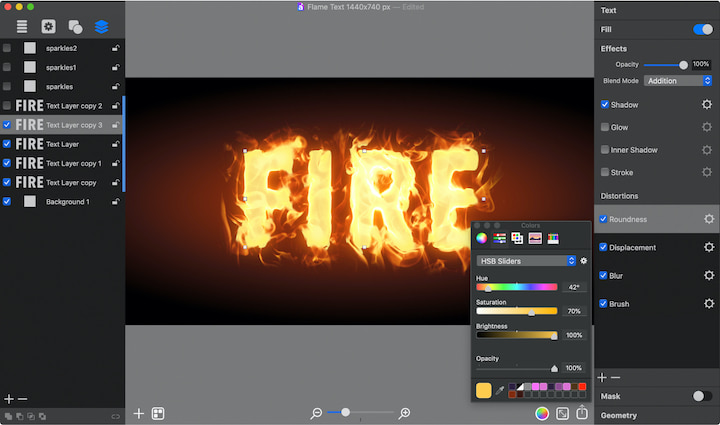
Fire Text Layer 4
Text Color HSB Sliders:
- Hue – 42°
- Saturation – 70%
- Brightness – 100%
Distortions:
- Roundness:
- Roundness – 20
- Offset – 0.2
- Sharpness – 1
- Displacement:
- Texture – smoke_tile
- Scale – 0.47
- Amount – 1.31
- Details – 44
- Blur:
- Texture – smoke_tile
- Scale – 0.47
- Amount – 53
- Details – 50
- Brush:
Texture—in this last instance, use a different custom texture which can be downloaded here fire_shader.png.- Density – 0.23
- Brightness – 0
- Contrast – 1
Add a Text With Fire Spray Fill
Now that you have the core of the flaming text ready, you can add some flame tongues to bring in a more realistic fiery look. For this, the Spray Fill feature is perfect since it distributes photo objects within a shape. In our scenario, you will distribute some flame tongue photo objects along with the word FIRE.
To begin, add one more text layer with the word FIRE, and choose the same font and kerning as with other FIRE layers. Position and resize this word, if necessary, in the way that it covers most of the text layers beyond it.
Then open the Fill tab of the Inspector and switch to Spray. Click on the “+” button and select the Fire category, where you will find flame tongue photo objects. Click on Fire_1, Fire_2, Fire_3, Fire_4, Fire_5, Fire_6, Fire_7, Fire_8, Fire_9, Fire_10 to add them into the list of fill objects. Once done, you can move on to adjusting the Spray Fill properties.
- Density – 11
- Size – set the slider roughly ¾ to the right.
- Angle – 65
Randomize properties:
- Position – set the slider roughly ⅘ to the right.
- Size – set the slider roughly ⅖ to the right.
- Angle – set the slider at the left-most position.
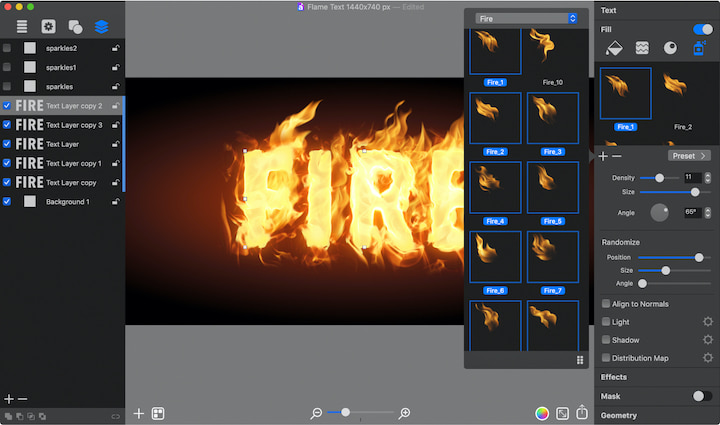
To finish with this layer, set the Blend Mode to Screen. Use this blend mode on all but the fourth text layer, where you should use Addition Blend Mode. There you are: the fire text effect is ready!
Tips:
Now, if you select every text layer in the Layers panel, you can easily change the word via the Text tab to FLAME, HOT, LOVE or any other word you want.
You can hide the background layer in the Layers panel on the Source tab to export the flaming text you created to an image file with transparency, which can be used as ready-made fire text typography graphics in other software. Note that you should also select the Transparent Background checkbox in the Art Text export dialog.