Creating Animations
Creating and Exporting Animations
The program can help you create animations. Unlike screen recording, this is a step-by-step process. At each step, you change the object's properties in the design. Then the program detects the changes and creates a smooth transition from one state of the design to another. Each of these states is represented by a keyframe. A sequence of keyframes is similar to a timeline in video editors. You can save an animation as a video file or animated GIF.
Any animation can comprise two or more keyframes with specified transition periods. The speed, at which visual effects take place, depends on the duration of the corresponding transition. For example, if an object was relocated by 100 pixels and the transition takes one second, then this object will move 100 pixels per second in the video.
The app interpolates values of properties between keyframes in the shortest possible way. For example, if an object has different locations in two keyframes, it will move along a straight line in the animation. If you rotate an object by 45 degrees, the same angle and direction will be animated. However, if you turn an object by 315 degrees clockwise (which is more than 180), the animation will have this object turning 45 degrees counter-clockwise because this is the shortest way to reach the final point. In order to animate rotation by more than 180 degrees, add an intermediate keyframe so that the rotation angles do not exceed 180 degrees.
The resolution of the video is based on the document size. You should set up the document dimensions before recording a new animation.
When you save a document, it preserves all the information related to the animation. After reopening the document, you will have the same sequence of keyframes.
Tools for Creating an Animation
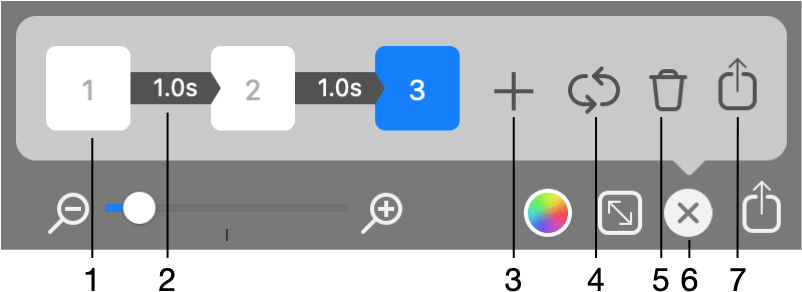
1 - A keyframe displaying its index.
2 - An arrow between two keyframes indicates the duration of the transition from one keyframe to another. You can edit the duration by clicking on it.
3 - Add a new keyframe.
4 - Loop the current animation.
5 - Delete all keyframes.
6 - Close the animation tools. The keyframes and transition settings will be preserved.
7 - Bring up the Export dialog for the current animation.
One of the keyframes can be highlighted with a blue color indicating that it is selected. This is used for editing keyframes.
Setting up the Transition
To set up the properties of the transition, click on the arrow that connects two keyframes.
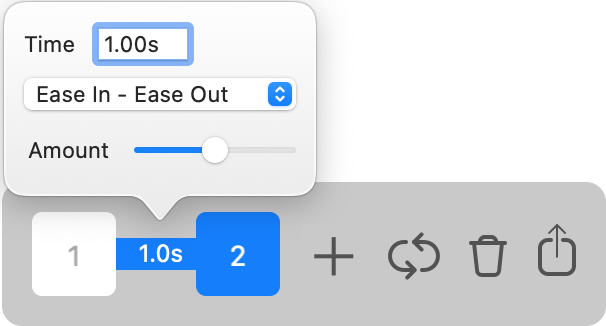
The popup panel lets you change the duration of the transition. You can also select how the animation should progress through the specified period of time by choosing a transition mode. Values between two keyframes can be interpolated linearly or nonlinearly. This becomes more clear when we talk about movement. The Linear option makes an object move with a constant speed. With the Ease option, the object gradually speeds up or slows down. You can choose different options for the start and end of the movement. For example, Ease In - Linear Out means that the object starts off slowly and then moves at a constant speed till the end. With the Spring option, the object will move at a constant speed and oscillate around the end point. The Amount property adjusts a portion of the transition time taken by the Spring or Ease effect.
Creating an Animation
- Make sure that your design looks in the same way as the beginning of the video should do.
- Click on the
 button at the bottom of the main window to bring up the animation tools.
 - Click the Add Keyframe button
 to add the first keyframe.
You still can make adjustments in the first keyframe. - Click on the Add Keyframe button to add the second keyframe.
- Make in your design changes that should become animated. These changes will be saved as the second keyframe because it is selected at the moment.
- Click the arrow between the two keyframes and set up the duration and transition mode.
- Repeat the previous steps as many times as you need: add one more keyframe, modify your design and set up the duration and transition mode.
- (Optional) To be able to play your animation endlessly, click on the Loop button
 .
. - Click on the Export Animation button
 to proceed to the Export dialog.
Note that you can export having at least two keyframes in the sequence. Changing the duration of any transition is possible at any time before you open the Export dialog.
The Loop button adds one more keyframe that is exactly the same as the first keyframe. This creates a smooth transition from the end of the animation to its beginning. Then the external player can be set up to play your animation repeatedly.
In order to delete all keyframes together with transition settings and start from scratch, click the Delete All Keyframes button ![]() . Note that there is no possibility to undo this action.
. Note that there is no possibility to undo this action.
Editing an Animation
The state of the design on the screen corresponds to a selected keyframe. By default, the app selects the keyframe that was added most recently. In order to select a different keyframe, click on it. This lets you edit your design at a state that relates to an earlier keyframe.
You can delete any keyframe except for the first one. To do this, move the cursor over the keyframe's icon. Click the Delete button that will appear in a corner of the icon.
Exporting an Animation
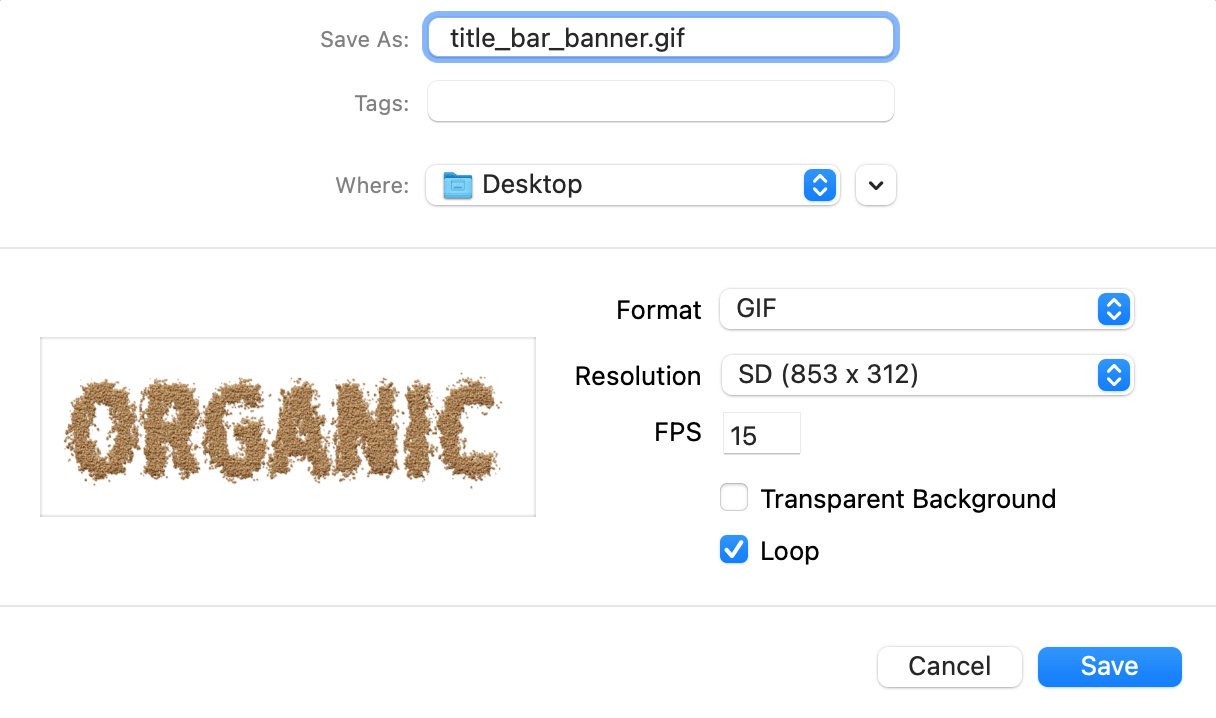
To export an animation, choose one of the video formats or animated GIF. Then select the resolution and set up the frame rate and compression. Finally, click on the Save button.