Exporting and Printing
Exporting your Design with a Depth Map
A depth map lets you create an illusion of a 3D image while your original image is a regular 2D picture. In order to simulate the third dimension, a depth map is used. It stores information about the distance from the viewer to different objects on the 2D picture. You could see 3D photos, created with this technique, on Facebook.
A specialized image viewer is needed to see the 3D effect. It must be able to open the picture and depth map together. The viewer presents the 3D effect as the possibility to slightly change the point of view by moving the mouse pointer over the picture, or in some other way.
When you export a 3D Photo, the program creates a folder with two files: your design and a depth map. Both of them are needed for the 3D photo effect.
What is a Depth Map
A depth map is a grayscale image where the brightness encodes the relative distance to an object in the picture. The darker the color is, the farther the object. Some viewers may require the opposite use of the brightness.
So, a depth map usually looks like contours of main parts of the picture filled with grayscale gradients, or grayscale plain colors.
Requirements to a depth map may vary depending on where you want to preview your images. Typically, these requirements apply:
- The original image and the depth map should have the same aspect ratio.
- Image format should be PNG or JPEG.
- Facebook also expects that the name of the depth map file is composed of two parts: the image name followed by "_depth". For example, if the image is named "forest.jpg", the depth map would be "forest_depth.jpg".
The Export Depth Map dialog will follow the rules above automatically.
The Export Depth Map Dialog
To open the Export Depth Map dialog, select File > Facebook 3D Photo… in the main menu. You can also click the Export button in the main window and choose Facebook 3D Photo.
Settings in the dialog affect the depth map, but make no change in your design.
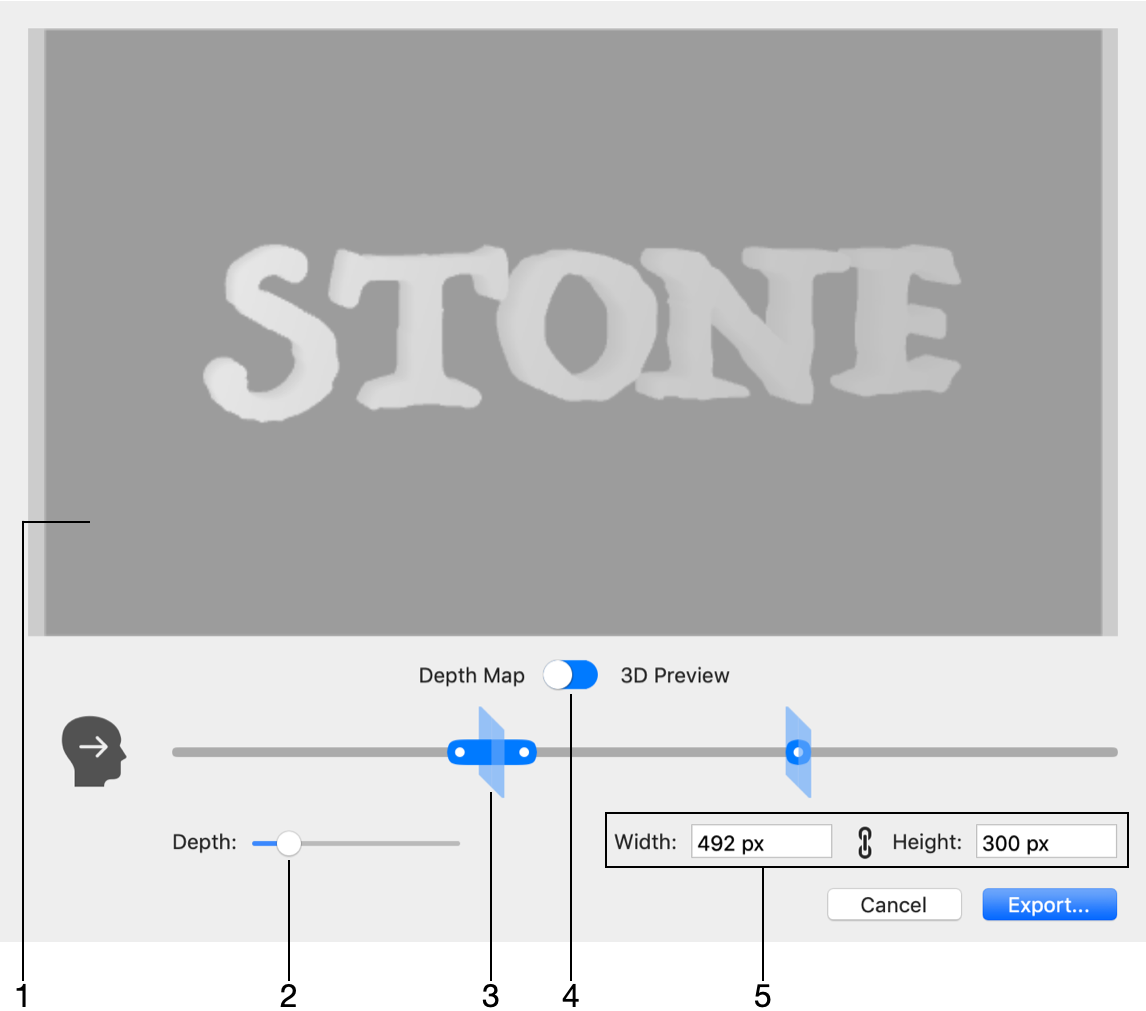
1 - The preview area. It can display either the depth map or 3D image depending on the switch below it. Move the mouse cursor over the 3D preview to see the 3D effect.
2 - The Depth slider changes the max range between the closest and farthest objects. This slider scales up or down all distances specified by the main slider.
3 - The point that represents the relative distance from the viewer to the object. The position of the viewer is indicated by the head icon on the left. You can move the object using its circular handle along the slide bar. How this bar works will be explained later.
4 - Show either the depth map or 3D preview.
5 - Set up the size of the depth map. By default, the fields show the size of your document. In most cases, you should keep the default size. When you enter new values, the program preserves the aspect ratio of the depth map automatically.
Adjust Distances to Objects

Objects are represented by planes 2, 4 and 5. 2D objects 4 and 5 have one handle. 3D object 2 has two handles. These two handles let you better represent the 3D object's depth by indicating the distance to the closest (1) and farthest (3) points of the object. Some 3D objects can be almost flat. In this case, you place handles 1 and 3 at almost the same point.
The object order is exactly the same as in your document. The list of layers would show object 2 at the top, and object 5 at the bottom.
By moving the handles, you can set the relative distance to each object, but you cannot place them in a different order. For example, point 4 will always be between 3 and 5. If 2 and 5 are objects placed over a background 5 in your design, the program will ensure that this order will not be broken when you export a depth map.
Larger the distance between the leftmost (1) and rightmost (5) points, deeper the 3D effect you will create.
Post Your 3D Photo on Facebook
In order to post a 3D Photo on Facebook, select the created image and depth map in Finder. Then drag them together into your new post on Facebook. You might see the "Creating 3D Photo" message for a few seconds before your image appears on the screen. To test the 3D Photo effect, just move the mouse cursor over the image in different directions.